Deploying GeneXus applications on CentOS with Ruby 1.9 and mysql (part 2)

If you haven’t’ read it, make sure to first, take a look at the part 1

What we’ll going to do today is actually create a GeneXus application with Ruby and mySql and deply (an run) it under CentOS platform

For this example we are going to install an run GeneXus “GoogleVisualization” Example.

You can download the KB from genexus open server.

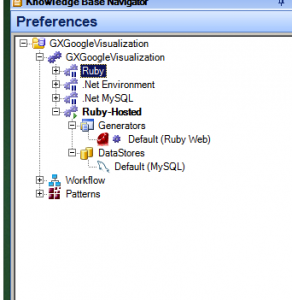
First we recommend we run it under the Default Ruby web-brick (local) environment. This is your development environment.

And the have a Deployment environment, in my case I’ve named it “Ruby-Hosted”.

On this new environment you have to configure the following options:

Under DataStore, configure the credentials for your “production” mySQL database.

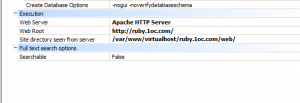
Under Generators, you have to change from “Webbrik HTTP server” to “Apache HTTP Server”.

On “Web Root”, the actual URL to the deployed website

and on “Site directory..” the full path of your application from “inside” the server.

Now you need to “Build All”.

Once it’s done, you simply copy the entire content of your “local deploy web directory” into your server deployed web directory, and run the application.

Now, you are “almost” ready, before you can RUN the program you have to run your “REORG” that on your first deployment is going to be the creation of the database.

In order to do that you need to “login” into your CentOS server through a TERMINAL, go to your deployment directory and run the reorg, like this:

$ cd /var/www/virtualhost/ruby.1oc.com/web

$ ruby reorganization.rb

DONE !

now point to your website and you see your Ruby application running

Deploying GeneXus applications on CentOS with Ruby 1.9 and mysql (part 1)

Firs of all you need a CentOS operating system with mysql, ruby 1.9 and passenger installed

If you don’t have this or you don’t know how to do it, just follow the simple instructions on these 2 posts:

Installing Ruby 1.9 on CentOS

Installing Phusion’s Passenger on CentOS (for Ruby 1.9)

Once you are done with this you are ready to move forward.

First you need to copy the following directories from your GeneXus installation to the CentOS server.

From under “gxruby” copy the “linux” and “generic” directory both under the same subdirectory.

In my case I’ve created a new directory on the server called “gxruby” (original 🙂 ), and put them there.

Now before you run the installation script, in order to work properly under CentOS you have to do the following:

  1. The installation script is based on Debian, so it expects to have certain libraries installed in places where CentOS doesn’t normally used them
    specially the “libmysqlclient”. On CentOS these library is called “libmysqlclient.so.15.0.0” and it’s under “/usr/lib/mysql/”, but in the installation
    script it should be under “/usr/local/lib/” so we’ll have to link it to the new location, we do this with the following command:
    $ ln -s /usr/lib/mysql/libmysqlclient.so.15.0.0 /usr/local/lib/libmysqlclient.so
  2. Under the subdirectory “gxruby/generic/gx_lucene” (this is where you copy from the GeneXus machine), you have to edit the script “build_make.sh”.
    In reality, because this file is corrupted on GeneXus Evo1 U3, it’s better if you delete it an create a new one with the same name with the following contente:

    #!/bin/sh
    tar -xzf clucene-core-0.9.21b.tar.gz
    cd clucene-core-0.9.21b
    sh autogen.sh
    sh configure
    make
    make install
    cd ..
    ruby extconf.rb –with-clucene-include=’clucene-core-0.9.21b/src’ –with-clucene-lib=’clucene-core-0.9.21b/src/.libs’ –with-ldflags=’-lclucene’
    make
    mkdir lib
    mv CLucene_gx.so lib
    gem build build_gem.rb
    gem install  CLucene_gx-0.1.1-x86-linux

NOTE:

In addition, if you are using a 64 bit platform replace the last line of the script for gem install  CLucene_gx-0.1.1-x86_64-linux

Now you are ready to run the installation script that will install all GeneXus gems on your system.

Go to “./gxruby/linux”, and run the “installgems.bash” script.

In order to do that just change the mode of the file to “executable” with $ chmod +x installgems.bash

and then runt $ ./installgems.bash

Now, you are ready to deploy your GeneXus Ruby applications.

If you don’t know how to do it, follow the next post where I’m going to walk you through the deployment process

😉

Installing Phusion’s Passenger on CentOS (for Ruby 1.9)

As a prerequisite you have to have installed Ruby 1.9.x on your CentOS system.

If you don’t know how to do it, follow the instructions on this post:

Installing Ruby 1.9 on CentOS

Once you are ready follow the next steps:

On a terminal type:

gem install passenger

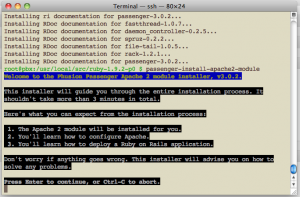
$ passenger-install-apache2-module

This last command is going to walk you through the process of installation,

helping you install whatever is missing on your system and at the end giving the instructions

to “patch” your apache’s configurations file.

passenger-install-appache2-module

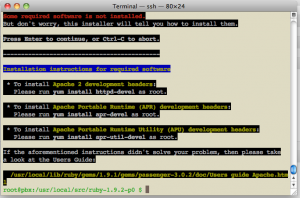
On my case, I had to install the following modules:

$ yum install httpd-devel

$ yum install apr-devel

$ yum install apr-util-devel

After installing them re-run the command again

$ passenger-install-apache2-module

And then edit the apache configuration

/etc/httpd/conf/httpd.conf

Ad the following lines to the file:

LoadModule passenger_module /usr/local/lib/ruby/gems/1.9.1/gems/passenger-3.0.2/ext/apache2/mod_passenger.so
PassengerRoot /usr/local/lib/ruby/gems/1.9.1/gems/passenger-3.0.2
PassengerRuby /usr/local/bin/ruby
And finally configure your VirtualDirectories (on the same file)
<VirtualHost *:80>
ServerName ruby.1oc.com
DocumentRoot “/var/www/virtualhost/ruby.1oc.com/web/public”
<Directory “/var/www/virtualhost/ruby.1oc.com/web/public”>
AllowOverride all
Options -MultiViews
</Directory>
</VirtualHost>
Now reboot the apache server
$ /etc/init.d/httpd restart
Stopping httpd:                                            [  OK  ]
Starting httpd:                                            [  OK  ]
Now you are ready to go.
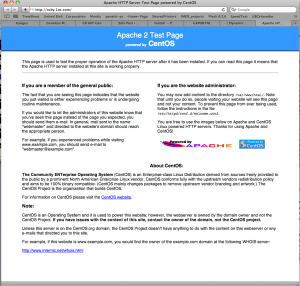
Test the site http://ruby.1oc.com/
ruby.1oc.com

Installing Ruby 1.9 on CentOS

$ sudo yum groupinstall 'Development Tools' $ sudo yum install readline-devel $ cd /usr/local/src $ wget ftp://ftp.ruby-lang.org:21//pub/ruby/1.9/ruby-1.9.2-p0.tar.gz $ tar xzvf ruby-1.9.2-p0.tar.gz $ cd ruby-1.9.2-p0 $ ./configure && make $ sudo make install
test the installations with
$ruby -v
ruby 1.9.2p0 (2010-08-18 revision 29036) [i686-linux]
Now, just in case the source became unavailable I'm including it here:
ruby-1.9.2-p0.tar.gz
NOTE:
If you're going to use Ruby for Genexus, the version 1.9.2 and above are NOT suported as this date, instead use the version 1.9.1
ruby-1.9.1-p429.tar.gz


How to install PHP-Soap package

$ yum install php-soap

There were also some updates to some of the PHP packages installed, so these were installed at the same time. After the install was complete, it is needed to restart Apache and the SoapClient class could now be load by PHP.

To restart Apache:

/etc/init.d/httpd –k restart